Developer Guide
Table of Contents
- Table of Contents
- Acknowledgements
- Introduction
- Setting up, getting started
- Design
- Implementation
- Documentation, logging, testing, configuration, dev-ops
- Appendix: Requirements
- Appendix: Instructions for manual testing
- Appendix: Effort
Acknowledgements
- The Summary bar feature was inspired by a similar feature of the past project NUS Mod Tracker, although our implementation is entirely new.
Introduction
This project is adapted from AddressBook3 and makes use of a few of its features. SoC InternApply is a project intended for SoC students who are applying for internships and are looking to keep track of all their applications.
This developer guide is intended for users who:
- Want to
developthis project further - Want to
adaptthis project for their own purpose - Are interested in how the
featuresare implemented
How to use this guide
For any user who wants to work on the code, you are highly encouraged to clone our team repository here
to your own github repository for referencing.
-
Users who want to develop the project further
-
You can start with reading through the implementation of the features to get familiar with the code base.
-
After which you can look into any proposed implementations and start coding your own proposed implementation of it, or read through the user stories to come up with any features that you believe would be useful.
-
You can alternatively help in cleaning up the code base by spotting bugs and raising them as issues to our team repository.
-
If you have your own proposed implementation, you can make a pull request to our team repository with a summary of the changes made.
-
-
Users who want to adapt this project or are interested in the features
-
You can start with reading through the implementation of the features and looking at the architecture design to get a better understanding of the code base.
-
You can then move on to adapting the codebase by removing all references to InternApply and modifying methods to suit your needs.
-
Glossary
- Mainstream OS: Windows, Linux, Unix, OS-X
- SoC: School of Computing
- SIA: SoC InternApply
Setting up, getting started
Refer to the guide Setting up and getting started.
Design
.puml files used to create diagrams in this document can be found in the diagrams folder. Refer to the PlantUML Tutorial at se-edu/guides to learn how to create and edit diagrams.
System Architecture
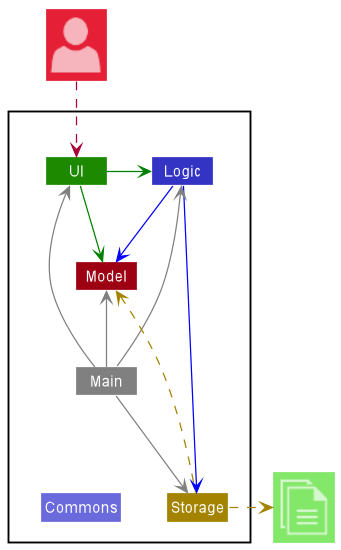
The Architecture Diagram given above explains the high-level design of the App.
A quick overview of the main components and how they interact with each other is provided below.
Main components of the architecture
Main has two classes called Main and MainApp. It is responsible for,
- At app launch: Initializes the components in the correct sequence, and connects them up with each other.
- At shut down: Shuts down the components and invokes cleanup methods where necessary.
Commons represents a collection of classes used by multiple other components.
The rest of the App consists of four components.
-
UI: The UI of the App. -
Logic: The command executor. -
Model: Holds the data of the App in memory. -
Storage: Reads data from, and writes data to, the hard disk.
How the architecture components interact with each other
The Sequence Diagram below shows how the components interact with each other for the scenario where the user issues the command delete 1.
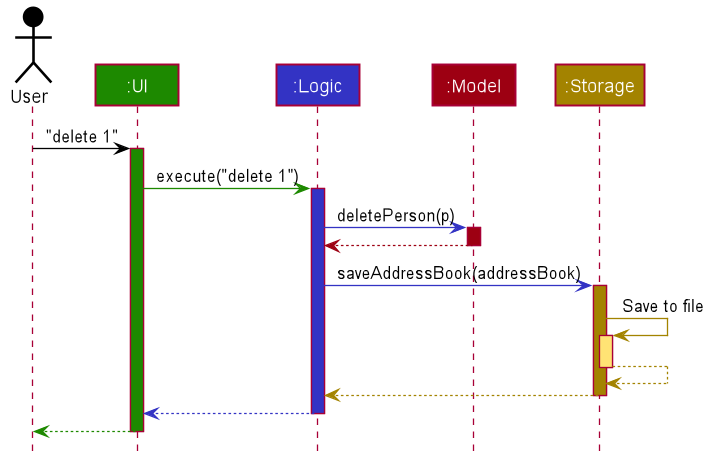
Each of the four main components (also shown in the diagram above),
- defines its API in an
interfacewith the same name as the Component. - implements its functionality using a concrete
{Component Name}Managerclass (which follows the corresponding APIinterfacementioned in the previous point.
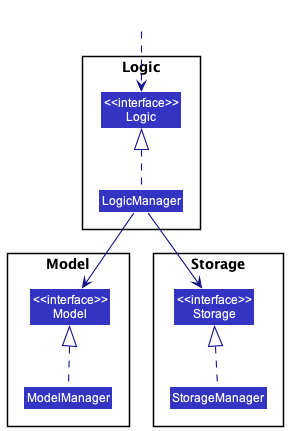
For example, the Logic component defines its API in the Logic.java interface and implements its functionality using the LogicManager.java class which follows the Logic interface. Other components interact with a given component through its interface rather than the concrete class (reason: to prevent outside component’s being coupled to the implementation of a component), as illustrated in the (partial) class diagram below.
The sections below give more details of each component.
UI component
The API of this component is specified in Ui.java
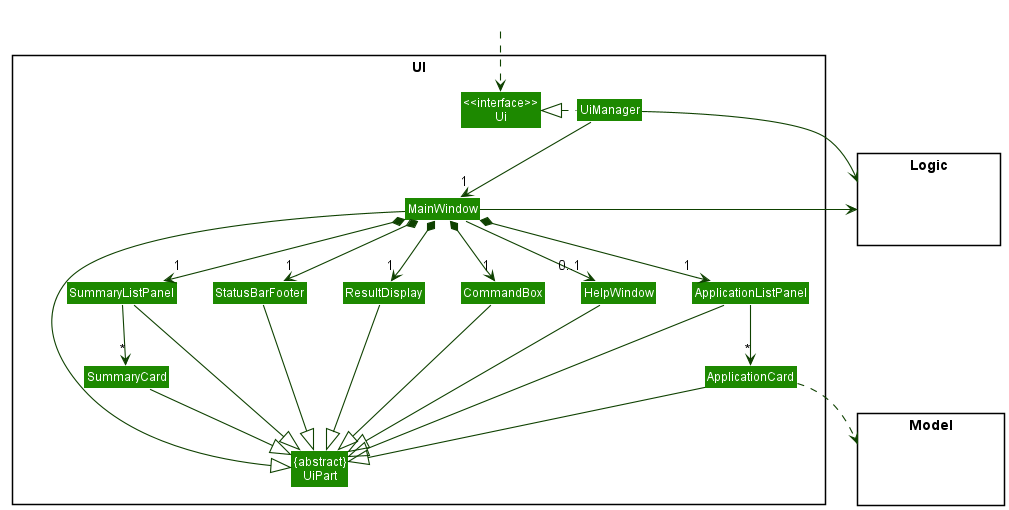
The UI consists of a MainWindow that is made up of parts e.g.CommandBox, ResultDisplay, ApplicationListPanel, StatusBarFooter etc. All these, including the MainWindow, inherit from the abstract UiPart class which captures the commonalities between classes that represent parts of the visible GUI.
The UI component uses the JavaFx UI framework. The layout of these UI parts are defined in matching .fxml files that are in the src/main/resources/view folder. For example, the layout of the MainWindow is specified in MainWindow.fxml
The UI component,
- executes user commands using the
Logiccomponent. - listens for changes to
Modeldata so that the UI can be updated with the modified data. - keeps a reference to the
Logiccomponent, because theUIrelies on theLogicto execute commands. - depends on some classes in the
Modelcomponent, as it displaysApplicationobject residing in theModel.
Logic component
API : Logic.java
Here’s a (partial) class diagram of the Logic component:
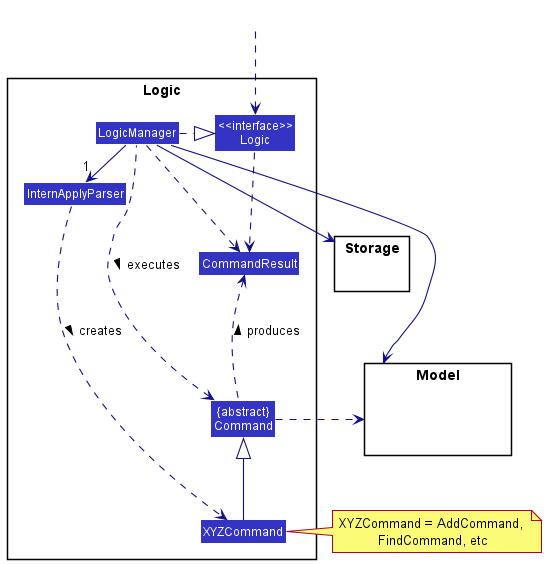
How the Logic component works:
- When
Logicis called upon to execute a command, it uses theInternApplyParserclass to parse the user command. - This results in a
Commandobject (more precisely, an object of one of its subclasses e.g.,AddCommand) which is executed by theLogicManager. - The command can communicate with the
Modelwhen it is executed (e.g. to add a person). - The result of the command execution is encapsulated as a
CommandResultobject which is returned back fromLogic.
The Sequence Diagram below illustrates the interactions within the Logic component for the execute("delete 1") API call.
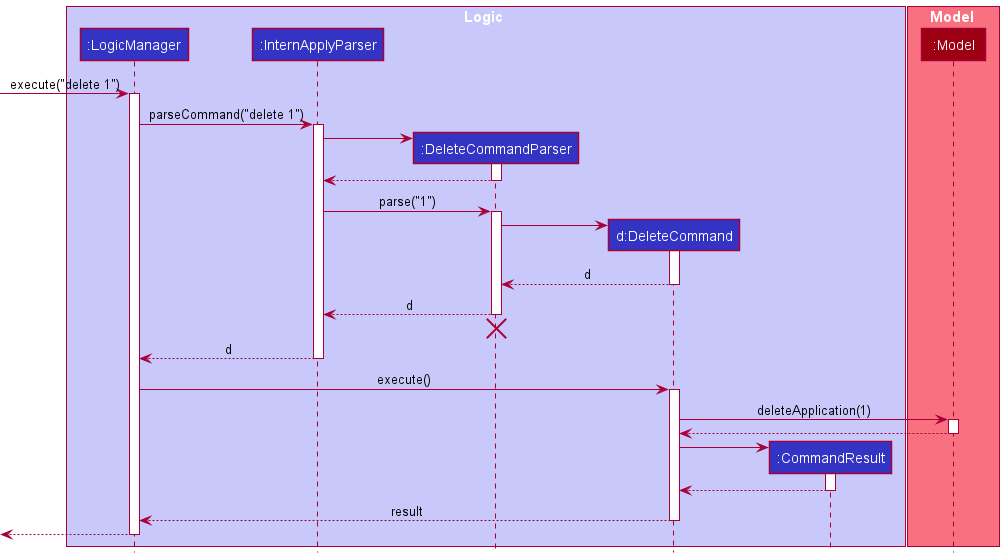
DeleteCommandParser should end at the destroy marker (X) but due to a limitation of PlantUML, the lifeline reaches the end of diagram.
Here are the other classes in Logic (omitted from the class diagram above) that are used for parsing a user command:
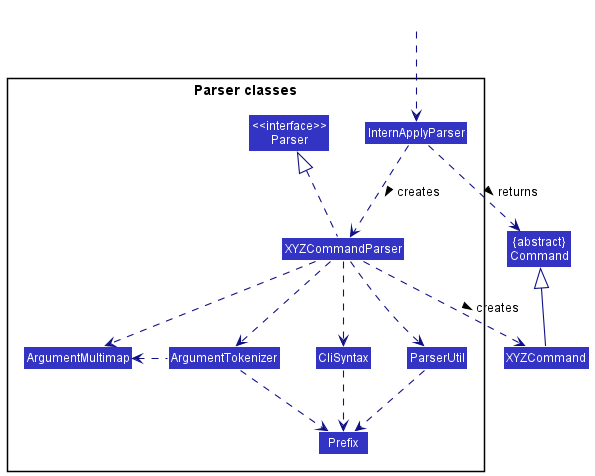
How the parsing works:
- When called upon to parse a user command, the
InternApplyParserclass creates anXYZCommandParser(XYZis a placeholder for the specific command name e.g.,AddCommandParser) which uses the other classes shown above to parse the user command and create aXYZCommandobject (e.g.,AddCommand) which theInternApplyParserreturns back as aCommandobject. - All
XYZCommandParserclasses (e.g.,AddCommandParser,DeleteCommandParser, …) inherit from theParserinterface so that they can be treated similarly where possible e.g, during testing.
Model component
API : Model.java

The Model component,
- stores SoC InternApply’s data i.e., all
Applicationobjects (which are contained in aUniqueApplicationListobject). - stores the currently ‘selected’
Applicationobjects (e.g., results of a search query) as a separate filtered list which is exposed to outsiders as an unmodifiableObservableList<Application>that can be ‘observed’ e.g. the UI can be bound to this list so that the UI automatically updates when the data in the list change. - stores a filtered list of
Applicationobjects (e.g., applications with upcomingInterviewSlot) as a separate upcoming list which is exposed to outsiders as an unmodifiableObservableList<Application>that can be ‘observed’. - stores a
SummaryListobject that contains a list ofSummaryBoxobjects which is exposed to the outsiders as an unmodifiableObservableList<SummaryBox>that can be ‘observed’. - stores a
UserPrefobject that represents the user’s preferences. This is exposed to the outside as aReadOnlyUserPrefobjects. - does not depend on any of the other three components (as the
Modelrepresents data entities of the domain, they should make sense on their own without depending on other components).
Storage component
API : Storage.java
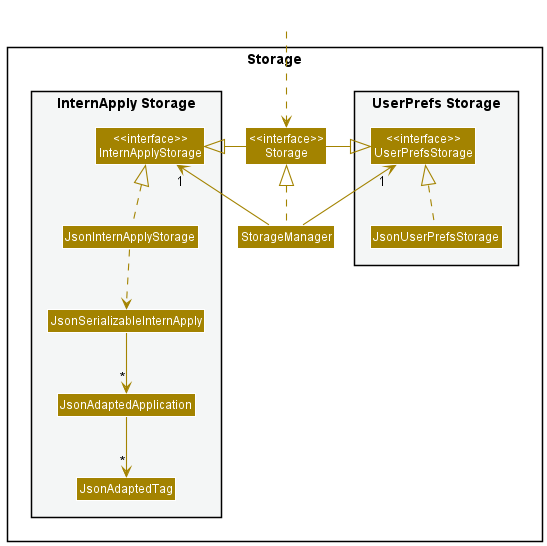
The Storage component,
- can save both SoC InternApply data and user preference data in json format, and read them back into corresponding objects.
- inherits from both
InterApplyStorageandUserPrefStorage, which means it can be treated as either one (if only the functionality of only one is needed). - depends on some classes in the
Modelcomponent (because theStoragecomponent’s job is to save/retrieve objects that belong to theModel)
Common classes
Classes used by multiple components are in the seedu.addressbook.commons package.
Implementation
This section describes some noteworthy details on how certain features are implemented.
Details field
Design Considerations
For our application, the chosen method of input is CLI (command line input), as such the length of each command needs to be considered in the design of features. To keep the add command as user-friendly as possible, the Details field is designed to be set to a default value for the addCommand. Input of the Details field is instead handled by the editCommand.
Implementation
The Details field for the application is abstracted into its own class much like the other fields stored by the application. The Details field stores one private final String details that stores the users desired input, and one constant variable which is the default value stores on creation.
The class contains two overloaded constructors. One that is used for the default creation of the object which does not take in any parameters and one that requires a String input as a parameter for creation.
Detailed below is an example of how the Details field is used by the addCommand and editCommand.
addCommand
Not much is changed for the addCommand, as the user is not allowed to type in the regex for adding details. The method instead, uses Details() to create a Details object with the default string value, which is parsed during the creation of the new application object.
editCommand
For the editCommand, a new regex was created in the CliSyntax class d/ to allow editCommandParser to recognize when the user wants to input to the Details field. The editCommand uses Details(String details) constructor instead to create a new Details object with the desired changes.
A new method detailsParser in the ParserUtil class to parse the details made by the user which is parsed to the Details constructor was also created. This method also has the job of trimming leading and trailing whitespaces, as well as interpreting the user desired string of input.
An example of how the parser works is:
- User inputs the command
edit 1 d/Desired line in detail \nnewline in the details field - The command is parsed through the
editCommandParserwhere the regexd/is detected to indicate the desire to modify the details field - The string
Desired line in detail \nnewline in the details fieldis parsed to theeditCommandthrough theparseDetailsmethod, where all\nare detected and replaced with a newline - The
editCommandis executed and the change to the application details field is made - The
detailsfield is then displayed by theUIas:Desired line in detail newline in the details field
Sequence Diagram illustrating interaction with Logic components for execute("edit 1 d/Line 1 \nLine 2"):
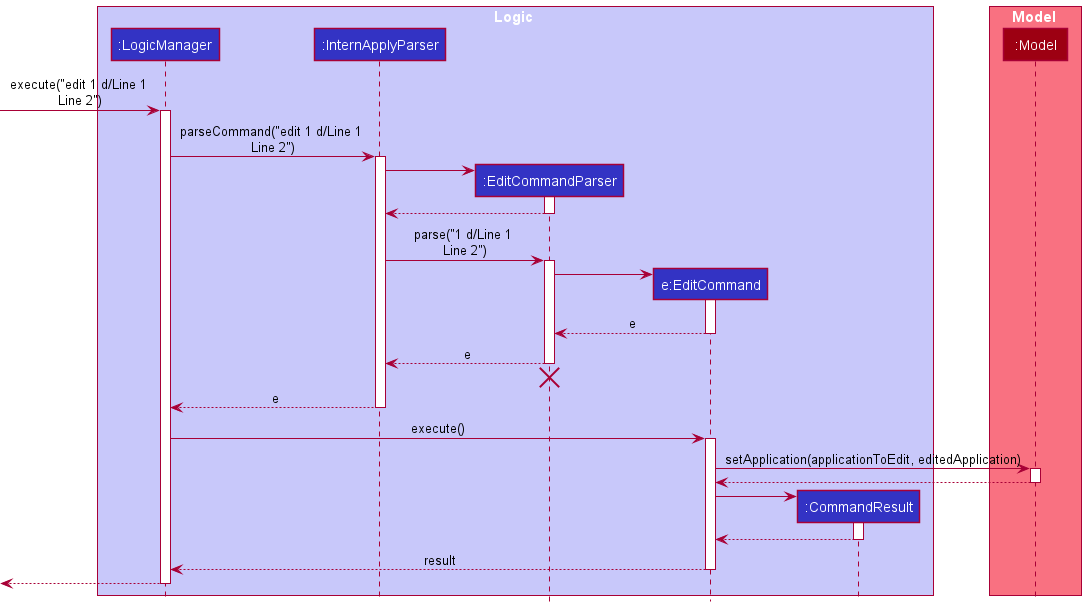
EditCommandParser should end at the destroy marker (X) but due to a limitation of PlantUML, the lifeline reaches the end of diagram. Note2: The sequence diagram is similar to the delete command, due to SoC InternApply using the command design pattern
UI
To display the new details field, modifications to the applicationCard.java and applicationCard.fxml files had to be made. As the user is able to input any amount of new lines in the details field, the label would need to be stored in a scrollPane to allow the user to read the details field. Modification to the minHeight of the applicationCard.fxml as well as the new label maxHeight was made to properly display of the details field.
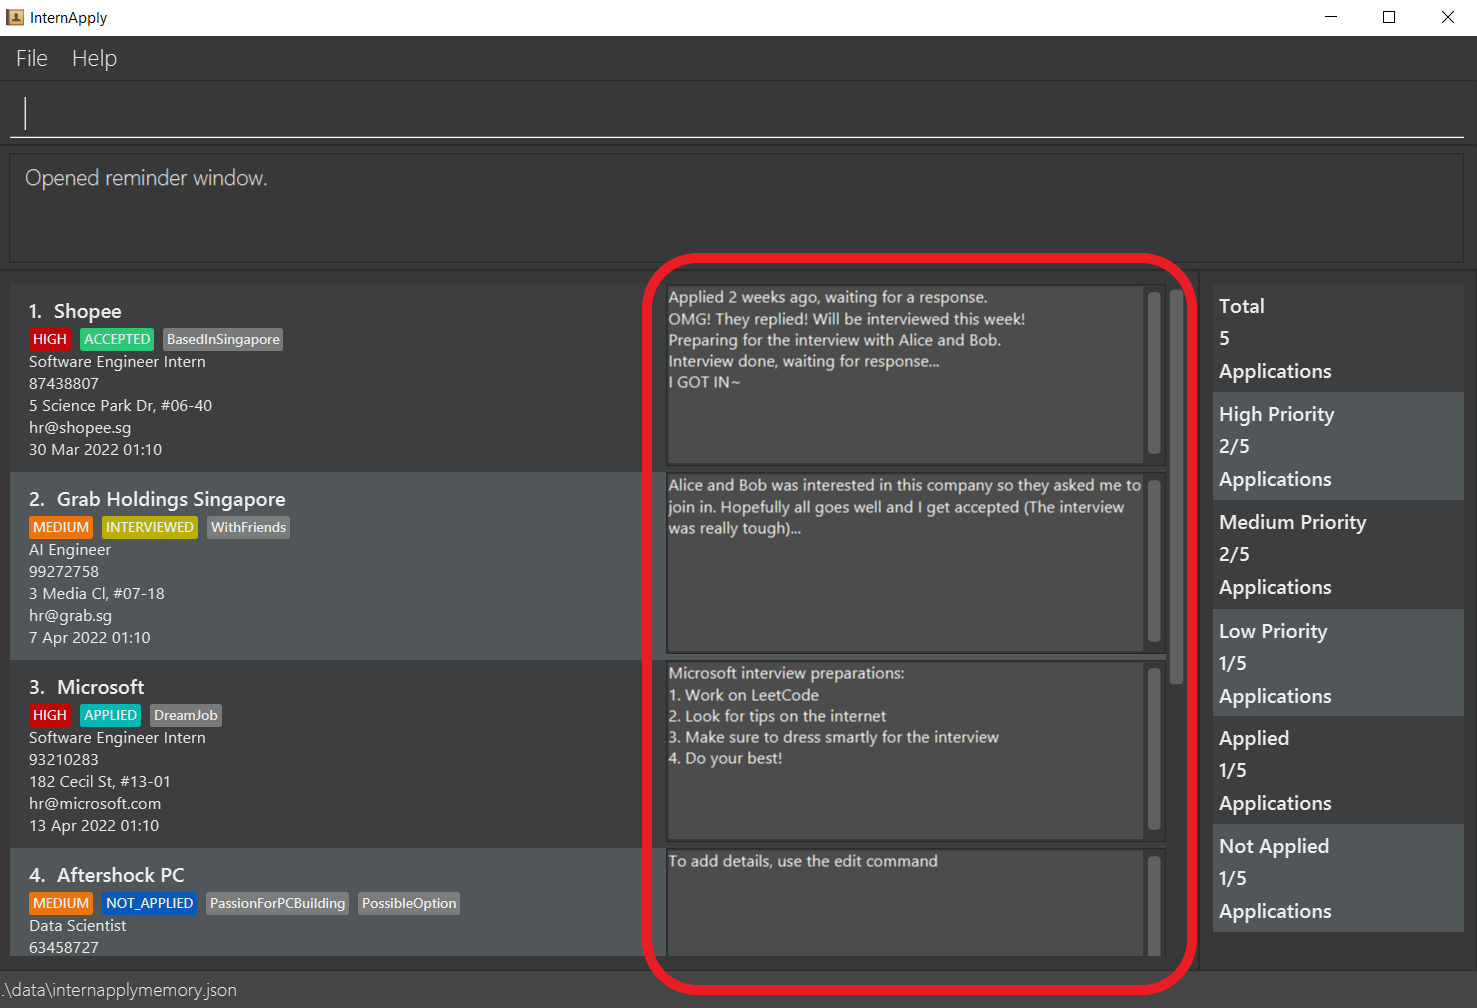
Below is an image of the UI after the changes were made:
Proposed improvements
- As the colour of each
application cardalternates between each index, changes to theUihave to be made as well to match the alternating colours. To achieve this change, implementing the css style inDarkTheme.cssfile, in particularList-viewcss should be made when implementing changes to theapplicationCard.fxml -
Further consideration can be made to how the user makes changes to the
detailsfield, as currently theeditCommandonly supports thereplacementof thedetailsfield with a new desired input.Proposed changes could be:
- The inclusion of a new regex such as
append/to indicate the users desire to add onto the details field - The creation of a new
commandthat handles the appending of changes to thedetailsfield similar to the above, the command could be namedappend.
- The inclusion of a new regex such as
Interview Slot field
Implementation
The InterviewSlot field is introduced to the Application model. The InterviewSlot is abstracted as its own class as per all fields of the Application model. Unlike other field classes, the value is stored as a LocalDateTime. This is to ensure the integrity of the date and time values stored.
The field is added and removed from an application using the idt/ prefix extending the EditCommand feature. The InterviewSlot#toString() will default MAX values to Interview date is not set. for applications with no interview date set.
💡 The field can only be edited onto an application. Users creating an application using the
addcommand will not be able to include theInterviewSlotfield. This is built with the logic that a newly added application will not have an interview slot yet.
ParserUtil#parseInterviewSlot() is use to parse the user input to a LocalDateTime value. Instead of using regex to valid the input value, the input is parse directly using LocalDateTime#parse() and if an ParseException() is thrown the input will be deemed invalid otherwise, valid.
The Interview Slot class consist of two constructors:
-
InterviewSlot()— Value is defaulted toMAXvalue. This is for newly created applications. -
InterviewSlot(String interviewDateTime)— Value is given as aStringargs then parsed and stored as value.
It uses two dates and time formats:
-
dd-MM-uuuu HH:mm— Users are to input values in this format. -
d MMM yyyy HH:mm— Display output format for users to not mixed up months and dates when values are similar.
Design considerations:
Aspect: How to parse date and time values:
- Alternative 1 (current choice): Use the java method and throw parse exception.
- Pros: Easy to implement. Reliable.
- Cons: Additional overheads may result in performance issues.
- Alternative 2: Use regex.
- Pros: Consistent with all other parsing styles of other fields.
- Cons: We must ensure that the implementation of the regex is correct.
Sort feature (using list command)
Implementation
The sort feature is an extension of the list command. It would be facilitated by the existing command but with additional input parameters to determine the field to sort by and in sorting order. The ListCommand will encapsulate the comparator sortingComparator and the ordering orderBy as fields.
The usage of the list command will be facilitated by using a newly implemented method Model#sortApplications() to update the sorting order of UniqueApplicationList.
The command parameter for ascending order is asc and descending order is desc.
The following comparators are implemented:
- ApplicationStatusComparator
- Compare the applications by the
statustag - The command parameter to use is
status -
Statustags are sorted by ascending order by default as per enum value inApplicationStatusTagTypeClick to view ordering
1. ACCEPTED 2. REJECTED 3. INTERVIEWED 4. APPLIED 5. NOT_APPLIED 6. (Empty Tag)
- Compare the applications by the
</details>
- InterviewSlotComparator
- Comapres the applications by the
InterviewSlotfield - The command parameter to use is
interview -
InterviewSlotfield is ordered in an ascending order by default starting from the earliest date and time.
- Comapres the applications by the
- NameComparator
- Compare the applications by the
namefield - The command parameter to use is
name -
Namestored as javaStringfields are converted to upper case usingString#UpperCase()and compared by using java string compare
- Compare the applications by the
- PriorityComparator
- Compare the applications by the
prioritytag - The command parameter to use is
priority -
Prioritytags are sorted by ascending order by default as per enum value inPriorityTagTypeClick to view ordering
1. (Empty Tag) 2. LOW 3. MEDIU 4. HIGH > 💡 If applications have the same value for the compared field, the comparator will use the `NameComparator` as a tie break to order the applications. This applies to all comparators except for `NameComparator`.
- Compare the applications by the
Usage
Given below is two possible usage scenario and how the list command behaves at each step.
1. list command without parameters
Step 1. The user launches the application. All internship applications are shown by default.
Step 2. The user uses the find command to find applications with specific values. As a result, only applications matching the find command are shown.
Step 3. The user uses the list command without parameters to make all applications visible.
2. list command with parameters
Step 1. The user launches the application. All internship applications are shown by default.
Step 2. The user uses the list command with field and order by to sort applications. i.e. list name asc. The list command then calls model#sortApplications(), causing the UniqueApplicationList to sort its internalList. In addition, the list command calls model#updateFilteredApplicationList() to display all applications.
Step 3. The user sees all applications sorted in the given specified order.
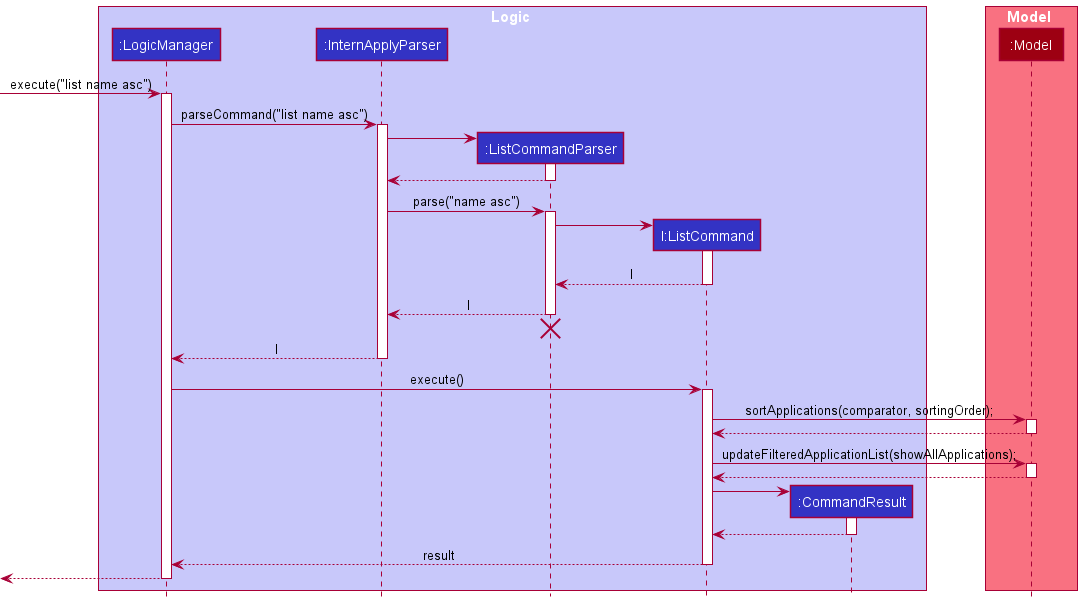
Below is a Sequence Diagram illustrating interaction with Logic components for execute("list name asc"):
Design considerations
Aspect: How the sorting feature called:
-
Alternative 1 (current choice): Implment it as a extension of
listcommand- Pros: Easy to implement.
- Cons: Users may be confused.
-
Alternative 2: Implment it as sperated command (i.e.
sortcommand)- Pros: Seperation of listing and sorting feature.
- Cons: Additional command implementation required. In addition, we must ensure that the implementation of the
sortcommand is correct.
Aspect: What is the default sorting order:
-
Alternative 1 (current choice): List will remain as per last sorted order
- Pros: Easy to implement.
- Cons: Users are unable to return to orignial sorting order.
-
Alternative 2: Implment a sort by
createdDateTime- Pros: Users are able to sort by the original order.
- Cons: Additional fields implementation required. In addition, we must ensure that the implementation of the
createdDateTimefield is correct.
Summary bar
Implementation
The Summary bar is facilitated by SummaryList in the model component. The SummaryList will compose of one
SummaryBox per statistic box in the summary bar. The summary bar resides in the SummaryListPanel in the UI component.
It takes a column on the right of the ApplicationListPanel and is populated by SummaryCard objects.
Each SummaryCard is associated with a SummaryBox that holds its relevant text and statistic.
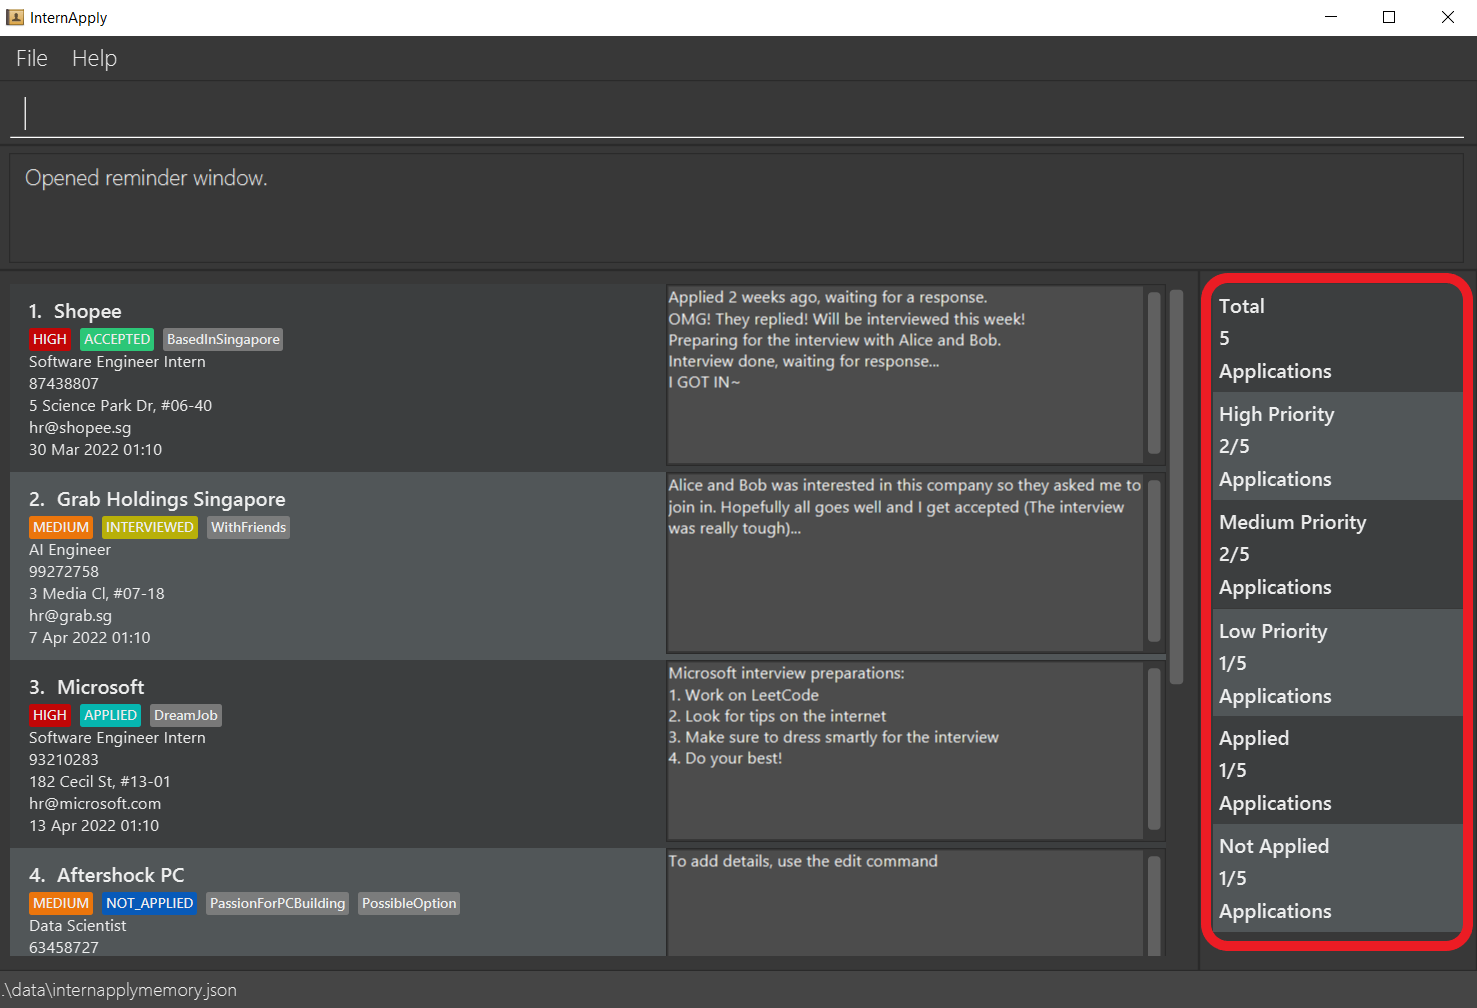
Summary bar UI (highlighted in red):
The SummaryList implements the following operations:
-
SummaryList#update()— Recalculate and update the list ofSummaryBoxobjects. -
SummaryList#getTotalApplications— Gets the total number of applications. -
SummaryList#getTotalTagApplications— Gets the total number of applications with a specific tag name.
SummaryList#update() will be exposed in the Model interface as Model#updateSummaryBoxList().
Below is an example scenario and how the SummaryBar will behave.
Step 1. The user launches the application. The SummaryBar will be initialized with statistics related to the current applications loaded from storage.
Step 2. The user executes add n/Shopee j/Software Engineer Intern p/87438807 e/hr@shopee.sg a/5 Science Park Dr t/SoftwareEngineering pt/HIGH ast/NOT_APPLIED to add an application. The add command calls Model#updateSummaryBar(), updating the SummaryList with new SummaryBox objects with updated values.
Step 3. The user executes edit 1 pt/low to edit the first applications’ priority tag to LOW. The edit command calls Model#updateSummaryBar(), updating SummaryList again.

Model#updateSummaryBar(), so the summary bar will not be updated.
Design Considerations:
Aspect: How update executes:
-
Alternative 1 (current choice): Recalculate and update all
SummaryBoxobjects on each command.- Pros: Easy to implement.
- Cons: May have performance issues when handling large number of applications.
-
Alternative 2: Individual command knows which specific
SummaryBoxto update.- Pros: Will use less computing (e.g. for
edit pt/HIGH, just update theSummaryBoxforHIGHpriority tag count). - Cons: We must ensure that the implementation of each individual command is correct, harder to implement.
- Pros: Will use less computing (e.g. for
Enhancement of edit to allow editing of Priority Tag and Application Status Tag
Implementation
The feature mechanism is facilitated by EditCommandParser, EditCommand and Tag. It modifies the following operations:
-
EditCommandParser#parse()— Recognizes theast/andpt/prefix to mean editing the Application Status and/or Priority Tag respectively. -
EditCommandParser#parseTagsForEdit()— Parses all recognizedTagTypethe user wants to edit into a Tag Set.
Additionally, it implements the following operations:
-
EditCommandParser#parseGenericTagsForEdit()— Specifically parses Tags with the prefixt/. -
EditCommand#getTags()— Identifies and constructs the new Tag Set of the edited application. -
EditCommand#findMatchAndCopy()— Extracts the Tags within a Tag Set matching a specifiedTagType. -
EditCommand#TagSetContainsTagTypePredicate— A static class that tests if a Tag Set contains a specifiedTagType. -
Tag#getTagType()— Returns theTagTypeof a Tag.
Given below is an example usage scenario and how the edit mechanism behaves at each step.
Step 1. The user launches the application. The application list contains 1 application that has the Tag “India”, ApplicationStatusTag “NOT_APPLIED” and PriorityTag “LOW”.
Step 2. The user executes edit 1 ast/APPLIED to edit the 1st application in the list.
Step 3. The EditCommandParser#parse() is called, parsing the user inputs.
Step 4. A new EditApplicationDescriptor is instantiated. EditCommandParser#parseTagsForEdit() is then called to construct a Tag Set containing the ApplicationStatusTag “APPLIED”.
Step 5. EditApplicationDescriptor#setTags() is called using the constructed Tag Set as input.
Step 6. EditCommandParser#parse() returns a new EditCommand instantiated with the parsed INDEX “1” and previously instantiated EditApplicationDescriptor
Step 7. EditCommand#execute() is called by the LogicManager. EditCommand#createEditedPerson() is called to instantiate a new editedApplication.
Step 8. EditCommand#getTags() is called which will construct a new Tag Set by comparing the edited Tag Set and existing Tag Set. Since only the ApplicationStatusTag “APPLIED” exists in the edited Tag Set, the newly constructed Tag Set will retain the Tag “India” and PriorityTag “LOW” of the existing Tag Set. A
Step 9. A Tag Set containing Tag “Singapore”, ApplicationStatusTag “APPLIED” and PriorityTag “LOW” is instantiated and is the Tag Set for editedApplication
Step 10. editedApplication will then replace the 1st Application in the list of applications.
The following sequence diagram shows how the edit operation works:
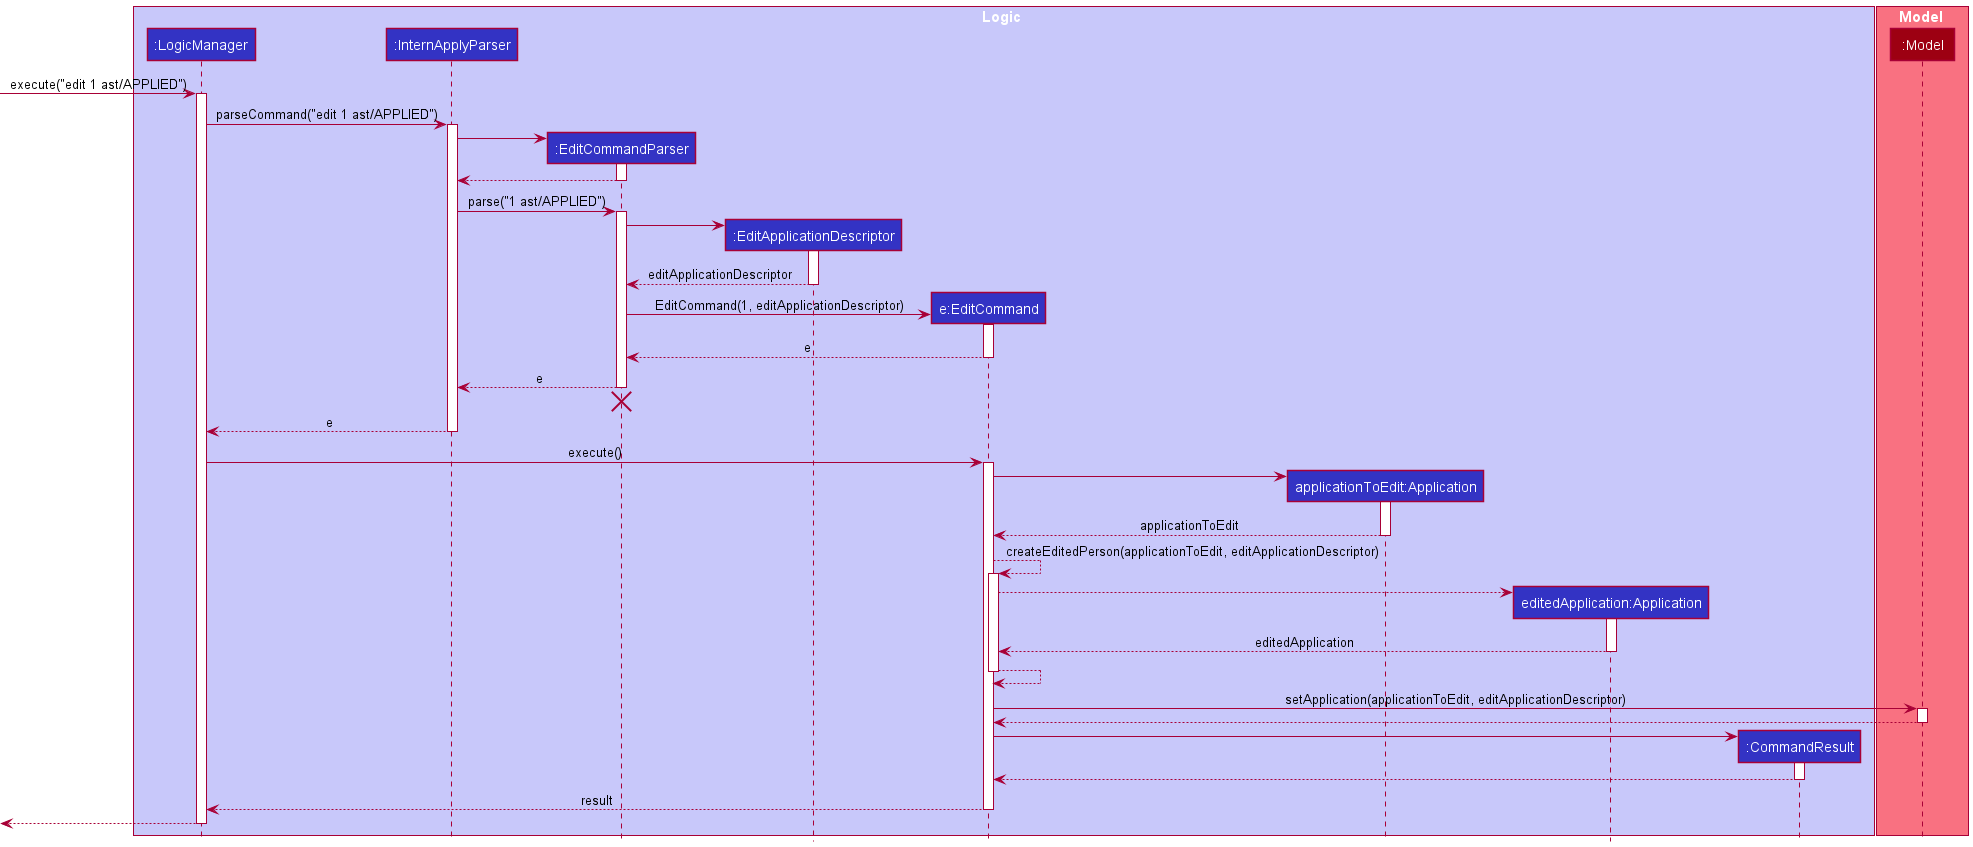
EditCommandParser should end at the destroy marker (X) but due to a limitation of PlantUML, the lifeline reaches the end of diagram.
Design considerations:
Aspect: How the feature could be implemented:
-
Alternative 1 (current choice): Build on
editcommand.- Pros: Easy to implement.
- Cons: Flexibility of dealing with Tags will be impacted.
-
Alternative 2: An alternative
edittagcommand will be implemented.- Pros: Greater flexibility to edit Tags (e.g.
edittag clear t/would clear all theTagof an existing application). - Cons: We would be writing repeated code since this would be implemented similar to
editcommand albeit with modified behaviour that accepts arguments other than prefixes.
- Pros: Greater flexibility to edit Tags (e.g.
Reminder feature
Implementation
The reminder mechanism is similar to the implementation of the existing help command. It is facilitated by a ReminderWindow that extends UiPart. An ApplicationListPanel is used to fill the inner parts of the ReminderWindow.
CommandResult facilitates this command by maintaining a new field showReminder that determines if the ReminderWindow gets generated as a result of a Command
A separate application list UpcomingApplicationList is being maintained in the LogicManager.
In addition, the ModelManager implements a new method updateUpcomingApplicationList that will cause the list to be updated.
InternApplyParser facilitates this command by now checking for the keyword reminder
MainWindow facilitates this feature by handling the opening of the ReminderWindow and also supports the initial opening of the ReminderWindow when SoC InternApply is first launched.
Methods that were implemented in existing classes:
-
Logic#getApplicationList()— Method that gets theUpcomingApplicationListto populate theReminderWindow -
LogicManager#getUpcomingApplicationList()— Method that gets theUpcomingApplicationListto populate theReminderWindow -
CommandResult#showReminder— A boolean that is used to determine if the CommandResult should cause theReminderWindowto be generated and shown. -
CommandResult#isShowReminder()— Method that returns the value ofshowReminder -
Model#PREDICATE_SHOW_UPCOMING_APPLICATIONS_ONLY— Predicate will only returntrueif theApplicationhas a valid upcomingInterviewSlot -
Model#getUpcomingApplicationsList()— Method that gets theUpcomingApplicationListto populate theReminderWindow -
Model#updateUpcomingApplicationsList()— Method that updates theUpcomingApplicationList -
ModelManager#PREDICATE_SHOW_UPCOMING_APPLICATIONS_ONLY— Predicate will only returntrueif theApplicationhas a valid upcomingInterviewSlot -
ModelManager#getUpcomingApplicationsList()— Method that gets theUpcomingApplicationListto populate theReminderWindow -
ModelManager#updateUpcomingApplicationsList()— Method that updates theUpcomingApplicationList -
Application#isUpcomingInterview()— Method that callsInterviewSlot#isUpcoming() -
InterviewSlot#isUpcoming()— Method that checks if theInterviewSlotis within a week of the local devices date and time. -
InterviewSlot#getInterviewSlot()— Method that returns theInterviewSlotas aLocalDateTime -
MainWindow#handleReminder()— Method that gets called if this feature is called by the user. It triggers the opening of theReminderWindow -
MainWindow#init()— Method that handles any method that needs to be called when SoC InternApply first launches. Currently, theremindercommand will get executed.
Existing classes that were modified:
-
CommandResult— Constructor has been modified to includeshowReminderas a required parameter. For all otherCommandtypes, the default value ofshowReminderis set tofalse -
CommandResult#equals()— Method has been updated to also check forshowReminder -
CommandResult#hashcode()— Method has been updated to also includeshowReminder -
InternApplyParser#parseCommand()— Method has been updated to also check forreminderas a valid case. -
UiManager#start()— Method has been updated to also callMainWindow#init()
New classes that were implemented:
-
ReminderCommand— ExtendsCommandclass and opens the “ReminderWindow” that contains a list based on theApplicationwhoseInterviewSlotfalls within a week of the current local date. -
ReminderWindow— Provides a pop-up window for users to view the upcoming Interviews that they have.
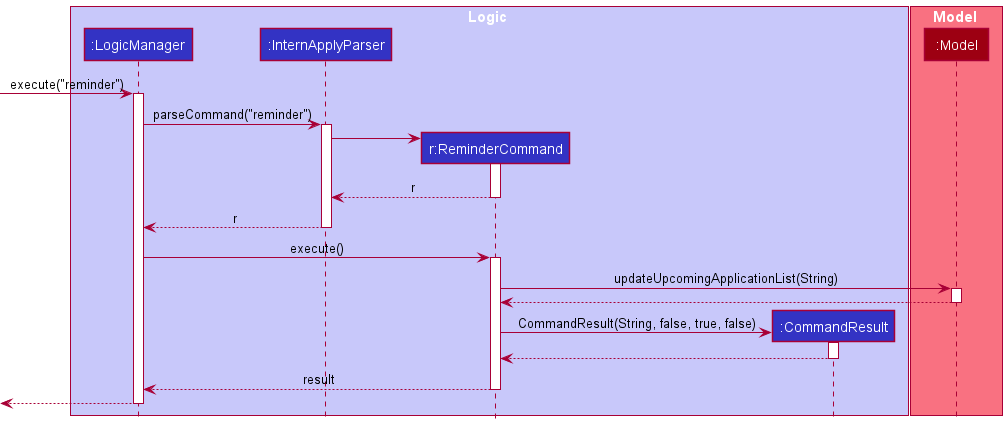
Given below is an example usage scenario and how the reminder mechanism behaves at each step.
Context: The user currently has a session of SoC Internapply open and accidentally closed the ReminderWindow that was opened when he/she launched SoC InternApply.
Step 1. The user enters the input reminder. The LogicManager will react to this and call InternApplyParser#parseCommand()
Step 2. InternApplyParser will parse the input then instantiate and return a new ReminderCommand
Step 3. LogicManger will execute the returned Command by calling ReminderCommand#execute()
Step 4. ReminderCommand will then call Model#updateUpcomingApplicationList() which will filter the UpcomingApplicationList stored in the ModelManager using PREDICATE_SHOW_UPCOMING_APPLICATIONS_ONLY
Step 5. ReminderCommand#execute() instantiates and returns a new CommandResult that has showReminder set to true.
Step 6. Since CommandResult has showReminder set to true, SoC InternApply will know to call MainWindow#handlReminder() which will open a ReminderWindow that is populated by the updated UpcomingApplicationList
Design considerations:
Aspect: How the contents of the ReminderWindow will be displayed:
-
Alternative 1: Create a predicate that filters the application list and fill the
ReminderWindowwith the filtered application list.- Pros: Fit well with the current UI implementation.
- Cons: Much more complex to implement.
-
Alternative 2: A simple text indicating the applications that are upcoming.
- Pros: Simple implementation that can be done by referencing the implementation of
HelpWindow. - Cons: Would not communicate the information as easily as a UI implementation.
- Pros: Simple implementation that can be done by referencing the implementation of
-
Alternative 3 (current choice) Create a copy of the
FilteredApplicationListcalledUpcomingApplicationListthat gets filtered with a custom predicate- Pros: Fit well with the current UI implementation. Also allows for the application list on the
MainWindowandReminderWindowto exist separately which makes theremindercommand more meaningful. - Cons: There is now 2 copies of the same application list at the beginning of each session.
- Pros: Fit well with the current UI implementation. Also allows for the application list on the
Find/filter feature
The proposed find/filter mechanism would be similar to the implementation of the existing find command.
The usage of the find command will be facilitated by using a newly implemented Predicate subclass inheriting from Predicate<Application> to update the application list displayed based on different fields such as: name, job title and tags.
Classes to be implemented are as follows:
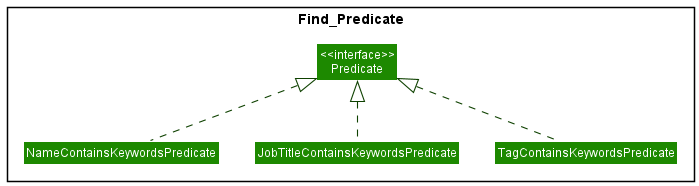
More details of how the classes are implemented as follows:
-
NameContainsKeywordsPredicate— ExtendsPredicate<Application>class and filters the application list based on theApplicationwhoseNamecontains the numbers typed in user input. -
JobTitleContainsKeywordsPredicate— ExtendsPredicate<Application>class and filters the application list based on theApplicationwhoseJobTitlecontains the keywords typed in user input. -
TagContainsKeywordsPredicate— ExtendsPredicate<Application>class and filters the application list based on theApplicationwhoseTagorPriorityTagorApplicationStatusTagcontains the keywords typed in user input, depending on the input format. For example:-
find pt/highwill find all applications with the high priority tag using theTagContainsKeywordsPredicate
-
Given below is an example usage scenario and how the find command behaves at each step when a user types in find n/shopee
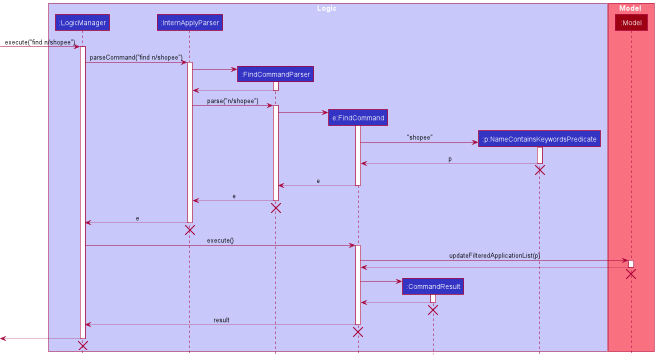
FindCommand should end at the destroy marker (X) but due to a limitation of PlantUML, the lifeline reaches the end of diagram.
Design considerations:
Aspect: What filters (fields) that the users can find:
-
Alternative 1 (current choice): Users can only find using the application name, job title as well as tags (
PriorityTagandApplicationStatusTagas well).- Pros: Simplicity in the product ensures user-friendliness.
- Cons: User might not be able to search for other fields such as phone or email in rare cases.
-
Alternative 2: Users can find using all the fields for each application.
- Pros: User has more flexibility to choose what criteria to find for.
- Cons: Too much flexibility will result in complexity and also most people would only search for the application based on its name, job title or tags instead of phone or email (which they do not remember).
Aspect: How many fields can users find:
-
Alternative 1 (current choice): Users can type in one of the fields:
Name,JobTitleandTagonly.- Pros: Users can do a more specific and narrow search, thus knowing what the results are based on.
- Cons: Users cannot find based oan multiple fields, might need to do search repeated times.
-
Alternative 2: Users can only find using more than keyword from
Name,JobTitleandTag.- Pros: User can do a more general search, showing all results that has those keywords for the particular field.
- Cons: User does not know the results is based on which field at a glance and has to spend more time looking through it and spending more time as compared to doing multiple separate searches.
Documentation, logging, testing, configuration, dev-ops
Appendix: Requirements
Product scope
Target user profile:
- is looking for an internship/job
- has a need to manage a significant number of job applications
- prefer desktop apps over other types
- can type fast
- prefers typing to mouse interactions
- is reasonably comfortable using CLI apps
Value proposition: manage internship applications faster than a typical mouse/GUI driven app
User stories
Priorities: High (must have) - * * *, Medium (nice to have) - * *, Low (unlikely to have) - *
| Priority | As a … | I want to … | So that I can… |
|---|---|---|---|
* * * |
user | Add Internship application | Track the company I have applied to. |
* * * |
user | View internship application | See the company application details and tasks |
* * * |
user | Edit internship application | Edit the details in case I made a mistake during input |
* * * |
user | Delete internship application | Remove irrelevant companies |
* * * |
user | Store my internship applications | Easily track and review them |
* * * |
user | View the list of companies I’ve applied/am planning to apply to | Easily track companies I’ve applied/am applying to |
* * * |
user | Be able to close the product | Exit when I am done |
* * |
user | Keep track of important dates | Better manage my time and prepare for interviews or assessments |
* * |
user | Keep track of status | Check the currently status of the application |
* * |
user | Sort application by companies or other details | Filter to what is important to me |
* * |
new user | View the help page | Refer to the help page when I need help |
* * |
user | Update the status of my internship application | I will be able to keep track of the current status and responses to the offers |
* |
user | Add question that are related to the internship | I know what coding questions to prepare for |
* |
user | Learn about internship requirements | I can plan my internship and course structure |
* |
user | Learn what is the skillset and/or knowledge expected of a CS intern | I can plan my learning to be a capable intern |
* |
user | maintain a journal of my internship | Users who are curious can read and get an idea of what the internship is like |
Use cases
(For all use cases below, the System is the SoC InternApply and the Actor is the user, unless specified otherwise)
Use case: Add an internship application
MSS
-
User adds a specific internship application with details e.g. company name, status, job title etc.
-
SoC InternApply adds the internship application into the existing list
Use case ends.
Extensions
-
1a. The given details is invalid.
-
1a1. SoC InternApply shows an error message.
Use case resumes at step 2.
-
Use case: Clearing all internship application
MSS
-
User clears all internship application.
-
SoC InternApply clears all internship application.
Use case ends.
Extensions
-
1a. No internship applications available.
Use case ends.
Use case: Delete an internship application
MSS
-
User requests to list internship applications
-
SoC InternApply shows a list of internship applications
-
User requests to delete a specific internship application in the list
-
SoC InternApply deletes the internship applications
Use case ends.
Extensions
-
2a. The list is empty.
Use case ends.
-
3a. The given index is invalid.
-
3a1. SoC InternApply shows an error message.
Use case resumes at step 3.
-
Use case: Edit an internship application
MSS
-
User requests to list internship applications
-
SoC InternApply shows a list of internship applications
-
User requests to edit a specific internship application in the list
-
User inputs a chain of changes
-
SoC InternApply edits the internship applications with the provided inputs
Use case ends.
Extensions
-
2a. The list is empty.
Use case ends.
-
3a. The given index is invalid.
-
3a1. SoC InternApply shows an error message.
Use case resumes at step 3.
-
Use case: Exit the app
MSS
-
User exits the app.
-
SIA saves all changes and closes all windows.
Use case ends.
Use case: Finding internship application(s)
MSS
-
User requests to find internship applications based on either its name, job title or tags.
-
SoC InternApply shows a list of internship applications with the field matching any of the keywords
Use case ends.
Extensions
-
1a. The given index is invalid.
-
1a1. SoC InternApply shows an error message.
Use case resumes at step 1.
-
-
1b. The given command format is invalid.
-
1b1. SoC InternApply shows an error message.
Use case resumes at step 1.
-
-
2a. No internship applications suit the criteria
- 2a1. SoC InternApply tells users there are currently no such internship applications.
Use case ends.
- 2a1. SoC InternApply tells users there are currently no such internship applications.
Use case: Seeking help about commands usages in the app
MSS
-
User seeks help from the app.
-
SIA shows a help page or user guide to the user.
Use case ends.
Use case: List all internship application without any sorting
MSS
-
User requests to list internship applications
-
SoC InternApply shows a list of internship applications based on the previous sorting method.
Use case ends.
Extensions
-
2a. The list is empty
- 2a1. SoC InternApply shows a blank list.
Use case ends.
- 2a1. SoC InternApply shows a blank list.
Use case: List all internship application with sorting
MSS
-
User requests to list internship applications with sorting criteria.
-
SoC InternApply shows a list of internship applications based on the sorting criteria.
Use case ends.
Extensions
-
2a. The list is empty
- 2a1. SoC InternApply shows a blank list.
Use case ends.
- 2a1. SoC InternApply shows a blank list.
Use case: Getting reminder manually of all internship application with interviews coming soon
MSS
-
User requests to list internship applications with interviews coming soon
-
SoC InternApply shows a list of internship applications with interviews that are within 1 week from now.
Use case ends.
Extensions
-
2a. No internship applications with interviews that are within 1 week from now.
- 2a1. SoC InternApply shows an empty application list.
Use case ends.
- 2a1. SoC InternApply shows an empty application list.
Non-Functional Requirements
- Should work on any mainstream OS as long as it has Java
11or above installed. - Should be able to hold up to 1000 internship applications without a noticeable sluggishness in performance for typical usage.
- A user with above average typing speed for regular English text (i.e. not code, not system admin commands) should be able to accomplish most of the tasks faster using commands than using the mouse.
Appendix: Instructions for manual testing
Given below are instructions to test the app manually. It is recommended to have the UserGuide open while doing manual testing.
Launch and shutdown
-
Initial launch
-
Download the jar file and copy into an empty folder
-
Double-click the jar file Expected: Shows the GUI with a set of sample applications. The window size is set to launch at a default size that displays all fields, but can be resized as needed.
-
-
Saving window preferences
-
Resize the window to an optimum size. Move the window to a different location. Close the window.
-
Re-launch the app by double-clicking the jar file.
Expected: The most recent window size and location is retained.
-
General Guideline for testing features
-
Features with one input
The following examples are tested on a list containing 1 or more applications and is targeted towards testing the delete command, the steps are general enough to be used to test other commands that accept a single parameter.-
Test valid input values
-
E.G.
delete INDEXTest case:
delete 1when list has more than 1 applicationExpected output: Successful execution of the command
-
-
Test invalid input values
-
E.G.
delete INDEXTest case:
delete 0ordelete -10Expected output: error message detailing what went wrong
-
-
Test invalid command input
- E.G.
delete INDEX
Test case:
delet 1ordelete 2 2Expected output: error message detailing what went wrong
- E.G.
-
-
Feature with multiple parameters
The following examples are tested on a list containing 1 or more applications and is targeted towards testing the edit command, the steps are general enough to be used to test other commands that accept multiple parameters.-
Test valid input values
-
E.G.
edit INDEX [Optional parameters]Test case:
edit 1 n/new namewhen list has more than 1 applicationExpected output: Successful change of application 1 name
-
-
Test invalid input values
-
E.G.
edit INDEX [Optional parameters]Test case:
edit 0 n/new nameoredit -10 n/new nameExpected output: error message detailing what went wrong
-
-
Test invalid command input
-
E.G.
edit INDEX [Optional parameters]Test case:
edi 1 n/new nameoredit 2 2 n/new nameExpected output: error message detailing what went wrong
-
-
Test multiple parameter combinations
-
E.G.
edit INDEX [optional parameters]Test case:
edit 1 n/new name n/actual nameExpected output: error message detailing what went wrong
Actual output: command executes
-
-
Summary bar feature
The following examples are tested on a list containing 1 or more applications.
-
Add application
Test case:
add n/Google j/Intern p/65218000 e/google@yahoo.sg a/70 Pasir Panjang Rd t/SoftwareEngineering pt/HIGH ast/NOT_APPLIEDExpected output: Summary box for
Total Applications,High Priority ApplicationsandNot Applied Applicationshave one more application and all summary boxes update the total number of applications. -
Edit application
Prerequisite: Application at index 1 is of
LOWpriority.Test case:
edit 1 pt/highExpected output: Summary box for
Low Priority Applicationsdecreases by one and Summary box forHigh Priority Applicationsincreases by one.
Deleting an application
-
Deleting an application while all applications are being shown
-
Prerequisites: List all applications using the
listcommand. Multiple applications in the list. -
Test case:
delete 1
Expected: First application is deleted from the list. Details of the deleted application shown in the status message. -
Test case:
delete 0
Expected: No application is deleted. Error details shown in the status message. Status bar remains the same. -
Other incorrect delete commands to try:
delete,delete x,...(where x is larger than the list size)
Expected: Similar to previous.
-
-
Deleting an application while reminder window is open
-
Prerequisites: Have the reminder window open using
reminderand set the first applications interview date to be within the next 7 days. -
Test case:
delete 1Expected: First application is deleted from the list. Details of the deleted application shown in the status message.
Application is also deleted from reminder window
-
Test case:
delete 0Expected: No application is deleted. Error details shown in the status message. Status bar remains the same. No changes to the reminder window.
-
Removal of Tags using edit
-
A single application, removal with replacement (no duplicate applications)
-
Prerequisite: Use
clearto delete all applications. Useaddto add a new application with aTag,PriorityTagandApplicationStatusTag. After each test, add the removed Tags back into the application. -
Test case:
edit 1 t/removetags
Expected: Only theTagof the application is removed. -
Test case:
edit 1 t/removepriority
Expected: Only thePriorityTagof the application is removed. -
Test case:
edit 1 t/removestatus
Expected: Only theApplicationStatusTagof the application is removed. -
Test case:
edit 1 t/removetags t/removepriority
Expected: Only theTagandPriorityTagof the application is removed. (inputs can be in any order) -
Test case:
edit 1 t/removetags t/removestatus
Expected: Only theTagandApplicationStatusTagof the application is removed. (inputs can be in any order) -
Test case:
edit 1 t/removepriority t/removestatus
Expected: Only thePriorityTagandApplicationStatusTagof the application is removed. (inputs can be in any order) -
Test case:
edit 1 t/removetags t/removepriority t/removestatus
Expected: All the Tags of the application is removed. This will still work on an application with no Tags but nothing will change. (inputs can be in any order)
-
-
Two applications with different
Tag-
Prerequisite: Use
clearto delete all applications. Useaddto add two new application with the same information except application 1 has noTagand application 2 has aTag -
Test case:
edit 2 t/removetags
Expected: Error occurs, duplicate application exists. Since application 1 has noTagand has the same information as application 2, removing all theTagfrom application 2 will make it a duplicate of application 1.
-
-
A Single application, trying to edit and remove different Tags at the same time
-
Prerequisite: Use
clearto delete all applications. Useaddto add a new application with aTag,PriorityTagandApplicationStatusTag. Make sure these Tags are different from what you input for the test cases. -
Test case:
edit t/removetags pt/high ast/applied
Expected: AllTagare removed.PriorityTagandApplicationStatusTagchanged toHIGHandAPPLIEDrespectively. -
Test case:
edit t/removepriority t/test
Expected: AllPriorityTagare removed.t/testis ignored, no changes toTag(t/removeprioritycan be replaced with any of the other 2 special inputs, same behavior is expected) -
Test case:
edit t/removepriority pt/high
Expected: AllPriorityTagare removed.pt/highis ignored, noPriorityTagis added. -
Test case:
edit t/removestatus ast/applied
Expected: AllApplicationStatusTagare removed.ast/appliedis ignored, noApplicationStatusTagis added.
-
Example: Sorting of applications using list
-
Sorting by company
namefield inascendingorder-
Prerequisite: There should at least be 2 applications. The applications must have a distinct company
name. For ease of explanation, we consider that there are only 2 applications namedAlphaandBeta. -
Test case:
list name asc
Expected: The updated order is displayed such thatAlphawill be the first application andBetawill be the second and last item listed. The status message will showSorted applications by name order by asc. -
Test case:
list name asc help
Expected: Similar tocase 2
-
-
Sorting by
Interview Slotfield indescendingorder-
Prerequisite: There should at least be 2 applications. The applications must have a distinct
interview slot. For ease of explanation, we consider that there are only 2 applications with the following interview slots10-04-2022 13:00and10-05-2022 13:00. -
Test case:
list interview desc
Expected: The updated order is displayed such as the application with interview slot10-05-2022 13:00will be the first application and the interview with the10-04-2022 13:00interview slot will be the second and last item listed. The status message will showSorted applications by interview order by desc. -
Test case:
list interview desc name asc
Expected: Similar tocase 2 -
Consider adding an additional application with no interview slot set. There are now 3 applications.
Test case:list interview desc
Expected: The application without an interview slot will now be the first item. The ordering of the 2 original applications remains consistent with the second and third applications.
-
- Sorting by
Statustag inascendingorder-
Prerequisite: There should at least be 2 applications. The applications must have a distinct
Statustag. For ease of explanation, we consider that there are only 2 applications with the followingStatustagNOT_APPLIEDandACCEPTED. -
Test case:
list status asc
Expected: The updated order is displayed such as the application with the statusACCEPTEDwill be the first application and the interview with the statusNOT_APPLIEDinterview slot will be the second and last item listed. The status message will showSorted applications by status order by asc. -
Consider adding an additional application with no status set. There are now 3 applications. Test case:
list status asc
Expected: The application without status will now be the last item. The ordering of the 2 original applications remains consistent with the first and second applications.
-
- Sorting by
Prioritytag indescendingorder-
Prerequisite: There should at least be 2 applications. The applications must have a distinct
Prioritytag. For ease of explanation, we consider that there are only 2 applications with the followingPrioritytagHIGHandLOW. -
Test case:
list priority desc
Expected: The updated order is displayed such as the application with priorityHIGHwill be the first application and the interview with the priorityLOWinterview slot will be the second and last item listed. The status message will showSorted applications by priority order by desc. -
Consider adding an additional application with no priority set. There are now 3 applications. Test case:
list priority desc
Expected: The application without a priority will now be the last item. The ordering of the 2 original applications remains consistent with the first and second applications.
-
-
Invalid sort command(s)
- Test case:
list address asc
Expected: Applications remain in current order. The error message is shown in the status message.
-
Test case:
list addressExpected: Applications remain in current order. The error message is shown in the status message.
- Test case:
Example: Finding an application
-
Finding an application while all applications are being shown
-
Prerequisites: List all applications using the
listcommand. Multiple applications in the list. -
Test case:
find pt/highExpected: All applications in the list with a high priority tag will be shown. Details of the number of results will be shown in the status message.
-
Test case:
find pt/notaprioritytagExpected: No changes. Error details shown in the status message that the keywords is incorrect for searching
PriorityTag. -
Other incorrect find commands to try:
find,find high(without thept),find n/(empty keyword)Expected: Respective error details shown in the status message
-
Saving data
-
Dealing with missing data files
-
Prerequisite: Locate the
internapply.jsonfile in thedatafolder. Open the file in any text editor, delete the contents and input a string of characters e.g.,This file is corrupted. -
Test case: Launch SoC InternApply. The list of applications should be empty and SoC InternApply still functions normally to valid inputs.
-
-
Making changes to the data files using any text editor
-
Prerequisite: Locate the
internapply.jsonfile in thedatafolder. Delete the file. Launch SoC InternApply. The set of sample applications should be loaded up. Close SoC InternApply. -
Test case: Open the
internapply.jsonfile. Modify the contents in the file while making sure the changes are valid in accordance to input constraints. Refer to our User Guide to ensure this part is done correctly. Save the changes made tointernapply.jsonand launch SoC InternApply again. The changes made should be reflected in the application list. -
Test case: Open the
internapply.jsonfile. Modify the contents in the file while making sure the changes violate the input constraints e.g., Change theNameof the first application fromShopeeto-#@$. Refer to our User Guide to ensure this part is done correctly. Save the changes made tointernapply.jsonand launch SoC InternApply again. There should be no applications listed in theMainWindow. All the applications, even those that were not modified, should have been deleted.
-
Appendix: Effort
Below is a short summary of the difficulties, challenges faced and achievements of the project
Difficulty Level
Difficulty: Medium
Much of the difficulty of our project stemmed from its start of it. Organizing and deciding on the direction of our project as well as dividing and agreeing on our initial workflow was difficult and really strained our teamwork. Once the initial phase of morphing the base project, and its basic fields were done, the rest of the new features were relatively easy to implement.
Challenges
- Morphing the project from AB3 was the biggest challenge faced, as most of the file structure and naming would need to be modified. One person would have had to handle the morphing first, so that the others could pull and implement their changes, to avoid handling multiple merge conflicts.
- Initially, familiarizing ourselves with the codebase was a large hurdle we needed to overcome before we could start implementing. any new features. There were many instances initially where making one change would result in multiple test cases failing or certain features. behaving incorrectly. However, once we were comfortable with the codebase, adding features was smooth and easy.
- Collaborating with a team of 5 people that had not met before, was challenging at the start, as the team dynamic was not established yet. this contributed to the initial challenge of deciding on the project direction and workflow.
Effort Required
- Meeting every Sunday 10 am, to discuss the week’s agenda and overall progress of the project. Meetings were increased to twice a week during busy periods such as near the end of V1.3 and V1.4, to ensure that we were meeting the requirements for the submission.
- Setting aside time every week to code and implement new features agreed on and staying available throughout the week to respond and implement bug fixes and changes raised by the group.
Achievements of the Project
Brownfield project completed in a team of 5, completed within 6 weeks during the semester, morphing of an existing project instead of creating a new one or extending an old project.